Final Walkthrough Before Closing 2026 Tool
A contract-evidence walkthrough for checking agreed condition, inclusions, repairs, new damage, major systems, vacancy, and the lawyer escalation path before closing.
Final Walkthrough Before Closing: Verify the Contract, Not the Decor
A final walkthrough is a pre-closing visit used to check whether the home remains in the agreed condition, included fixtures and chattels remain, contracted repairs appear complete, and no material new damage is visible. It is not normally a new inspection condition, a chance to renegotiate ordinary wear, or proof that every hidden system works.
The buyer should arrive with the agreement, amendments, inspection photos, repair invoices, inclusion list, and a simple evidence log. If a problem appears, document it and contact the real-estate professional and lawyer immediately. The signed contract and provincial law decide the remedy; the buyer should not threaten to cancel or withhold funds without advice.
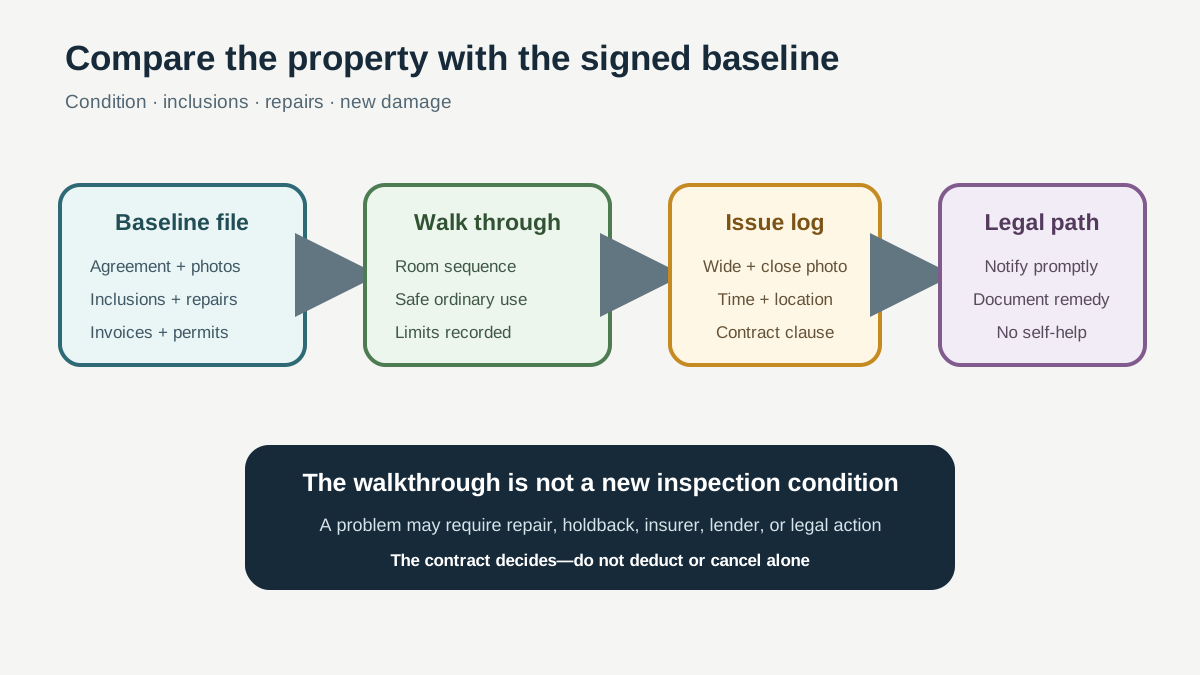
Short answer: compare today with the agreed baseline
The walkthrough has four tests:
- Condition: Is the property materially in the state the buyer agreed to purchase, allowing for contract terms and ordinary use?
- Inclusions: Are the fixtures and chattels named as included still present and substantially as expected?
- Repairs and obligations: Has the seller completed written repair, cleaning, removal, permit, or document promises?
- New damage: Did fire, water, freezing, moving, vandalism, vacancy, or another event change the property after the offer?
RECO's current pre-closing visit guidance identifies the same core checks for Ontario buyers: condition since the last viewing, appliances and major systems, included fixtures, and agreed repairs or other contract requirements. It also notes that the property still belongs to the seller, so extra attendees need permission.
Do not wait until key pickup to report an issue. Lawyers need time to read the agreement, contact the other side, obtain evidence, and identify a lawful closing response.
Confirm the contractual right to enter
A buyer does not own the property during the visit. Access comes from the agreement or seller's permission.
Before offer acceptance, negotiate:
- number of buyer visits;
- permitted timing and notice;
- who may attend;
- access after seller move-out if possible;
- right to bring an inspector, contractor, appraiser, insurer, or measuring professional;
- purpose of each visit;
- responsibility for damage or disruption;
- access to verify written repairs;
- treatment of tenanted or occupied property.
Do not assume “two visits” permits destructive testing, a contractor parade, tenant marketing, furniture delivery, painting, or storage. Ask in writing.
BCFSA's public clause resource includes an access clause and a more detailed joint walk-through deficiency process. These are BC industry examples, not national wording. They show why access, notice, attendees, and repair treatment should be drafted before a dispute.
Build the baseline file when the offer is signed
The final visit is stronger when the buyer can prove the starting point. Save:
- full agreement and schedules;
- listing photos and remarks;
- seller property disclosure where provided;
- home inspection report and material photos;
- condo or strata disclosure package;
- written inclusions and exclusions;
- rented-equipment schedule;
- repair amendment and specifications;
- invoices, permits, warranties, and reinspection records;
- buyer photos from permitted earlier visits;
- seller correspondence about damage or changes.
Marketing material is not always a contractual promise. Match each expected item to the signed agreement. A patio set visible in a photo, television mounted on a bracket, smart-home subscription, rented water heater, or staging mirror may not be included unless the contract says so.
The title-insurance policy guide covers legal title risk, not missing furniture or a new hole in drywall. The agreement and closing professionals handle those facts.
Schedule the visit for useful evidence
An ideal walkthrough occurs after most seller belongings have been removed but early enough for the lawyers to act. A second brief visit on the closing day may be useful where the contract permits it.
Ask:
- Will utilities still be on?
- Has the seller moved out?
- Is the home vacant, tenanted, or occupied under a rent-back?
- Will repairs and cleaning be complete?
- Can the buyer see the garage, attic access, crawlspace, lockers, parking, and outbuildings?
- Will keys, remotes, codes, and manuals be left with the lawyer or at the property?
Do not schedule the only visit late on the closing afternoon. An unresolved leak or removed appliance cannot be assessed sensibly while funds and registration are already moving.
Bring a compact walkthrough kit
- phone or camera with timestamp enabled;
- flashlight;
- outlet tester only if competent and permitted;
- painter's tape or labels only with seller permission;
- agreement and inclusion list;
- inspection priority photos;
- repair amendment and invoices;
- notepad with room sequence;
- real-estate professional's and lawyer's numbers;
- shoe covers where requested.
Do not use moisture, electrical, gas, appliance, or mechanical tools beyond your competence. The goal is to observe and record, not damage the seller's property or create a safety event.
Start outside: access, structure, and move-out damage
Walk the perimeter where access and weather allow.
Check:
- roof and exterior for obvious new storm or moving damage;
- windows and exterior doors;
- grading, drains, window wells, and standing water;
- decks, rails, fences, gates, and retaining walls;
- driveway, walkway, and garage doors;
- included sheds, play structures, docks, or equipment;
- oil, propane, or fuel arrangements named in the agreement;
- garbage, construction debris, and abandoned belongings;
- trees or landscaping removed contrary to the agreement;
- visible damage caused by moving trucks.
Season and snow can hide evidence. Record limitations rather than declaring the exterior clear. If the agreement required a repair, inspect the specific location and evidence supplied.
Room-by-room interior sequence
Move in a consistent direction and take wide photos before close-ups.
Entry and general condition
- unexpected water, smoke, pet, sewage, or fuel odour;
- new wall, floor, stair, door, or trim damage;
- belongings and garbage removal under the contract;
- included lights, window coverings, mirrors, shelving, and hardware;
- signs that utilities or heat are off;
- evidence of unauthorized occupancy after expected vacancy.
Kitchen
- included refrigerator, range, dishwasher, hood, and built-ins present;
- model or serial matches where a specific item was promised;
- visible damage from appliance removal;
- taps, drains, and accessible plumbing show no active leak during ordinary use;
- cabinets, counters, and included fixtures remain;
- rented or leased equipment matches the contract.
Do not run a long appliance cycle without permission or enough time to monitor it. A brief operational check is not an appliance warranty.
Bathrooms and laundry
- visible supply and drain leaks;
- toilets, faucets, showers, and fans respond under ordinary use;
- included washer and dryer remain;
- no new overflow, freeze, or move-out damage;
- caulking or tile repairs promised in writing appear complete;
- shutoffs and drains are not obstructed by seller items.
Avoid running several fixtures at once unless the seller and building systems permit it. Report any active leak immediately.
Basement, crawlspace, and mechanical area
- new water entry, pump failure, sewer odour, or freezing;
- heating equipment operating as seasonally appropriate;
- electrical panel intact and no obvious removed breakers or copper;
- water heater and rented-system status consistent with agreement;
- included freezer, shelving, workbench, or equipment present;
- repaired foundation or drainage area visible where promised;
- no new debris blocking access.
Do not reset breakers, open energized panels, relight fuel equipment, or enter unsafe spaces. Use a qualified professional where a material condition is suspected and access is permitted.
Bedrooms and living areas
- windows and doors not newly damaged;
- included blinds, drapes, light fixtures, fans, and built-ins remain;
- floors and walls not materially damaged during move-out;
- smoke and carbon monoxide devices present where agreed or required;
- no newly visible leak after furniture removal.
Furniture can conceal damage that neither seller nor buyer previously saw. The contract and facts determine responsibility; document the discovery without assuming a remedy.
Fixtures, chattels, rentals, and smart-home devices
A fixture is generally attached to the property, while a chattel is movable, but legal classification can be disputed. The offer should name important items rather than rely on the label.
Create an inventory:
| Item | Included/excluded/rented | Identifying detail | Present? | Condition note |
|---|---|---|---|---|
| Refrigerator | Included | Brand/model/serial if stated | ||
| EV charger | Hardwired/unit/accessory cable | |||
| Water heater | Rental/owned | Provider and contract | ||
| Security cameras | Cameras, hub, subscription | |||
| Smart thermostat | Device and account reset | |||
| Garage openers | Motor and remotes | |||
| Condo locker | Unit/assigned number |
Digital devices need an account handoff. Ask whether cameras, locks, alarms, thermostats, irrigation, solar, batteries, and doorbells will be factory reset and whether subscription or leased hardware is excluded.
Do not connect devices to the buyer's account before possession without permission. Record serials and request manuals, codes, and warranty documents through the agreed channel.
Use the complete fixtures and chattels closing inventory to verify ownership, serials, rentals, recalls, and account handoff. Separately confirm vacant possession across every unit and storage area, and let the lawyers apply the closing-holdback controls if a narrow unresolved obligation can be handled that way.
Verify repairs against the written scope
“Seller to fix leak” is poor drafting. A useful repair amendment identifies location, cause or scope, contractor qualification, permits, materials, completion date, evidence, reinspection, and consequence of incomplete work.
Compare the result with the property disclosure statement and updates. Confirm any permit or legalization promise reached the exact inspection stage required, and preserve new evidence under the latent/patent defect response rather than assigning legal blame during the visit.
At the walkthrough, compare:
- amendment wording;
- before photos;
- contractor invoice and paid status;
- permit and final inspection if required;
- transferable warranty;
- visible workmanship;
- operation or reinspection result;
- related damage such as drywall or flooring restoration.
A fresh coat of paint is not proof that a moisture source was repaired. An invoice for “roof service” may not match a promise to replace a specified section. Ask the lawyer how to handle a mismatch.
The home inspection condition guide explains why specialist evidence belongs in the condition period. The walkthrough verifies agreed completion; it rarely recreates that condition.
Three common walkthrough problems
Missing included appliance
The agreement includes a named refrigerator, but the seller replaced it with an older unit. Photograph the replacement and model information. Send the inclusion clause and evidence to the lawyer. Do not negotiate cash directly with the seller at the property.
New water leak
The buyer finds water under a bathroom and staining below. Stop ordinary fixture use, photograph the source and affected area, notify the representatives, and ask whether emergency mitigation is underway. The lawyers and insurers need to determine risk, repair, holdback, delay, or other contract response.
Repair incomplete
The seller agreed to have a licensed electrician correct a panel issue and provide an invoice. The work appears incomplete and no document exists. Record the panel from a safe distance, send the amendment, and request evidence. Do not open the panel or accept a verbal promise after closing without advice.
What to do when you find a problem
Use a five-step evidence protocol:
- Stop and protect safety. Do not manipulate a hazardous system.
- Record neutrally. Take wide and close photos, video, time, location, and observed facts.
- Match the contract. Identify the inclusion, repair, condition, representation, or damage clause involved.
- Notify promptly. Contact the buyer's licensed representative and lawyer using trusted channels.
- Follow legal direction. Possible responses depend on agreement and law.
Possible negotiated or legal responses may include repair before closing, price amendment, lawyer holdback, insurance involvement, undertaking, closing delay, closing with reserved rights, or litigation. None is automatic.
Do not:
- declare the deal cancelled at the property;
- threaten the seller or occupants;
- remove an item as “compensation”;
- hire a contractor to alter the seller's home without authority;
- unilaterally deduct money from final funds;
- post allegations publicly;
- sign a release you do not understand.
The lawyer needs the complete, unedited evidence. Keep original files and avoid filters or annotations that hide context.
Material change and home insurance
A loss between agreement and closing can involve both seller and buyer insurers, risk-of-loss language, lender requirements, and repair timing. Notify the home-insurance closing team if the walkthrough reveals fire, water, theft, vandalism, freeze, or vacancy damage.
The buyer's lender may require confirmation that the property remains acceptable security and that the policy will bind. A price holdback does not necessarily solve an insurer or lender condition.
Ask the lawyer:
- Who bears risk under this agreement before completion?
- Must the seller notify the buyer of material damage?
- Is insurance money or repair available under the contract?
- Can the lender still fund?
- Does a holdback require lender approval?
- Should closing be delayed, completed, or disputed?
Condo and strata walkthrough additions
Check the unit plus the interests promised in the agreement:
- legal parking and locker location;
- fobs, remotes, keys, and mailbox;
- common-element damage caused by move-out;
- included unit improvements and appliances;
- balcony or patio contents under the rules;
- current signs of water or building work;
- move booking, elevator deposit, and access hours;
- utility and meter arrangements;
- tenant vacancy or lease handoff;
- notices received since document review.
A walkthrough cannot update the corporation's entire financial condition. Ask for material new status, strata, assessment, insurance, or litigation notices according to the agreement and lawyer advice. Use the status-certificate review for the Ontario document layer.
Tenanted, rent-back, and occupied properties
Possession may not be vacant. The agreement should state whether a tenancy continues, the seller remains temporarily, or vacant possession is required.
For a continuing tenancy, verify through the lawyer:
- lease and lawful rent evidence;
- deposits, prepaid rent, and key transfer;
- notices and disputes;
- tenant belongings versus included seller chattels;
- condition-report process where applicable;
- insurance and lender acceptance of rental use.
For seller rent-back, specify occupancy period, payment, deposit, insurance, utilities, maintenance, access, damage, keys, and overholding response. Do not improvise a tenancy after closing without legal and insurance advice.
If vacant possession was promised but the seller or tenant has not left, tell the lawyer immediately. Do not enter, move belongings, or change locks before legal possession.
Winter, vacant, and long-closing risks
A home can change materially over a long closing. Winter adds frozen pipes, snow-covered exterior, ice damage, heating failure, and inaccessible drainage. Vacancy adds theft, vandalism, unnoticed leaks, and policy conditions.
For a long closing, negotiate additional visits and material-change notices. Ask the seller to maintain utilities, heat, snow access, security, and insurance as the agreement requires.
At the visit:
- check indoor temperature and visible freeze damage;
- observe taps only through ordinary permitted use;
- inspect around water heater, laundry, sump, and foundation;
- record snow or ice limitations;
- confirm no copper, appliances, fixtures, or equipment were removed;
- ask how often a vacant property is checked under insurance rules.
Do not declare a snow-covered roof or yard defect-free. Record what could not be observed and ask the lawyer about any prior condition or representation.
New construction: walkthrough versus PDI
A builder pre-delivery inspection, deficiency process, occupancy inspection, and final resale-style walkthrough can be different events. Provincial warranty rules and the purchase agreement govern.
Before the builder visit:
- obtain the warranty program's current checklist;
- bring plans, selections, change orders, and finish schedule;
- confirm who may attend;
- record missing, damaged, incomplete, or substituted work;
- distinguish warranty deficiencies from contract price or design disputes;
- obtain the signed deficiency record and submission deadline;
- do not accept a verbal promise that an omitted item is “in the system.”
BCFSA's clause library provides one example of a jointly signed deficiency list and repair process. New-build buyers should use province-specific warranty and legal advice, especially if occupancy and title transfer occur on different dates.
Closing-day cash and document reconciliation
The walkthrough does not replace the lawyer's financial statement. Separately confirm:
- deposit credited once;
- final down payment and costs received;
- property-tax, condo, rent, and fuel adjustments;
- lender funds and insurance binder;
- mortgage payout and title registration;
- key and possession release condition;
- repair holdback or amendment documented;
- identity and wire instructions authenticated.
Use the cash-to-close worksheet ten business days before closing. A walkthrough issue can change cash treatment, but only through a documented lawyer-led response.
Buyer walkthrough checklist
Contract evidence
- agreement, schedules, and amendments;
- inclusions, exclusions, and rentals;
- repair scope and invoices;
- inspection comparison photos;
- access and attendee permission.
Property check
- no material new exterior or interior damage;
- utilities and major systems checked within permitted scope;
- no active leak, freeze, fire, vandalism, or move-out damage;
- included items and accessories present;
- seller property and debris removed as agreed;
- repairs match written evidence;
- parking, locker, keys, remotes, and codes accounted for.
Issue response
- originals photographed and timed;
- relevant contract clause identified;
- representative and lawyer notified immediately;
- lender and insurer notified if material;
- no unilateral deduction, repair, or cancellation;
- resolution documented before closing.
Seller preparation checklist
- keep property insured and utilities operating through the advised date;
- protect floors, walls, doors, and exterior during move-out;
- leave every included fixture, chattel, accessory, and manual;
- remove excluded belongings and debris as agreed;
- complete written repairs early enough for evidence and reinspection;
- retain paid invoices, permits, and warranties;
- disclose material new damage promptly through proper channels;
- provide access with appropriate notice;
- do not substitute an included item without written agreement;
- confirm keys and possession handoff with the lawyer.
A clean handoff protects the seller too. Dated photos after move-out can document property condition and contents.
Frequently asked questions
What is a final walkthrough before closing?
It is a contract-based visit to verify agreed condition, inclusions, repairs, and no material new damage shortly before completion. Access and rights come from the agreement or seller's permission.
Is a final walkthrough the same as a home inspection?
No. The inspection condition supports pre-firm due diligence and specialist review. The walkthrough compares the property with the agreed baseline and written repairs. It usually does not reopen a satisfied condition.
When should the walkthrough happen?
After most seller belongings are removed but early enough for lawyers to respond. The agreement may permit one or more visits. Avoid relying only on a last-minute closing-afternoon visit.
Can I bring an inspector or contractor?
Only if the agreement or seller permits it. RECO says extra attendees, including inspectors and contractors, require seller permission for an Ontario pre-closing visit unless the agreement already provides access.
What should I test?
Within permission and safe ordinary use, observe included appliances, visible plumbing, heating or cooling as seasonally appropriate, doors, windows, lights, and other agreed systems. A brief check is not a warranty or invasive inspection.
What if an included appliance is missing?
Photograph the area and any replacement, identify the inclusion clause, and notify the representative and lawyer. Do not take another seller item or negotiate an undocumented cash exchange.
What if I find new water damage?
Stop unsafe or unnecessary use, document source and extent, and contact the lawyer, representative, insurer, and lender as advised. Risk, repair, funding, holdback, and closing options depend on contract and facts.
Can I refuse to close after a bad walkthrough?
Do not assume so. A walkthrough issue does not automatically create a termination right. Obtain immediate legal advice about the agreement, materiality, evidence, and available remedy.
Can I hold back money for unfinished repairs?
Only through an authorized agreement or legal process, often with lender involvement. Do not subtract an amount from final funds on your own.
Should the seller cancel insurance before the walkthrough?
No automatic date applies. The seller should maintain coverage until its insurer and lawyer confirm ownership, possession, and risk have ended. The buyer should bind coverage for the advised effective time.
Method and source note
This guide was updated July 19, 2026. It uses current RECO guidance on Ontario pre-closing visits, BCFSA closing and clause resources, and CMHC's homebuying closing checklist. It separates common practical checks from legal rights that depend on province and contract.
Use a lawyer or notary qualified where the property is located. The agreement, amendments, risk-of-loss rules, insurer, and lender determine the response to a specific problem.
What to read next
- Understand why the walkthrough does not replace the home inspection condition.
- Reconcile funds with the Canadian cash-to-close worksheet.
- Bind the correct date with the home-insurance closing workflow.
- Separate physical damage from title-insurance coverage.
Advertisement

About David R. Chen, CFA
David R. Chen is a Chartered Financial Analyst and the Senior Housing Economist at BubbleWatch.ca. He brings 12+ years of experience in quantitative real estate analysis and mortgage underwriting. Formerly an analyst at a major Canadian bank, he specializes in modeling payment shock, regional affordability divergence, and private lending risk.
View David's professional bio & credentials →